Imagine going on power lunch with your boss and he asks you for impromptu company presentation, but you didn’t bring your laptop with you. Wouldn’t it be ingenious if you’d be able to present them on your iPhone (or other multimedia device)? Xilisoft lets you can convert PPT files to video (or HD video) without having PowerPoint on your computer.
Create PowerPoint presentations in video format, so sharing them would be easier. With Xilisoft PowerPoint to Video Converter, produce presentations that can be played on virtually any digital device that supports video-play.
There are actually 3 kinds of PowerPoint to Video Converters: Personal, Business and Free editions.
The Free edition only supports Standard video formats as output files with no sound effects or animation. This edition is suitable for simple presentations, with you as the live commentator to insert remarks and commentaries in between clips.
Personal and Business both convert PowerPoint to SD or HD videos with the option to customize the output video. With both editions, you can attach background music and record voice-overs in sync with the slides for the presentation - this is a great idea when you couldn’t personally present the video.
In addition to these features, both Personal and Business lets you apply watermark to the video, perfect for business users with copyright and trademark protections.
Only Business users are able to install a copy of Business version to as much as 5 separate computers.
Xilisoft PowerPoint to Video Converter is ideal for presentation authors who needed to make video slideshows for trade shows, exhibits, school use, business meetings and other business projects - simply by playing them on ordinary TV and multimedia players without connecting them to a computer.
It’s also convenient to share these videos on YouTube, e-mail, or other media websites – it’s just like sharing a video to your contacts.
Presentation work is so much easier with Xilisoft PowerPoint to Video Converter, because with this, you no longer need to depend on Microsoft PowerPoint. You can now present, share, and send video-presentations anytime, anywhere and on virtually any multimedia device!
Friday, January 29, 2010
Sunday, January 17, 2010

Wednesday, January 13, 2010
ImTOO Blu Ray Ripper Guide
ImTOO Blu Ray Ripper Guide
This step-by-step guide is to show you the basic skills of how to rip blu ray disc to high-definition or general video files with ImTOO Blu Ray Ripper.
Before you start, please download, install and launch ImTOO Blu Ray Ripper.
For your convenience, this guide is divided into 3 parts:
Part 1: Getting Started
Part 2: Clip Video File
Part 3: Edit Video Effect
Part 1: Getting Started
Step 1: Load blu ray disc
Insert a blu ray disc, and click "Add Blu Ray Folder" button on the toolbar, then select the inserted disc in the dialog box that opens. All the titles in the disc will be displayed in the file list as below.
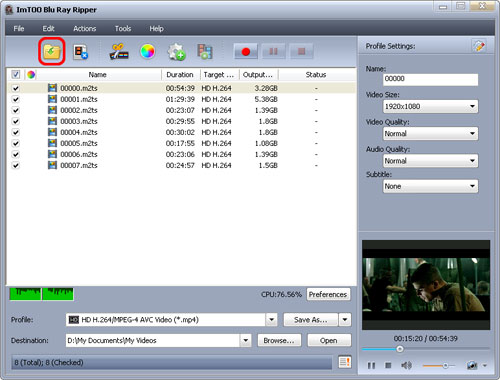
Step 2: Set destination
Click "Browse" button at the bottom of the window, and select a folder as "Destination" to save the output files on a designated folder.
Tip: Click "Open" button to check the output files directly after ripping is done.
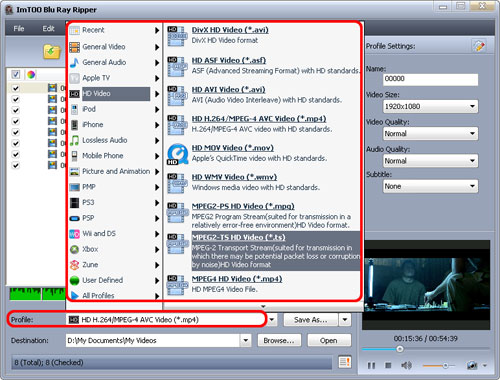
Step 3: Select output format
Select one or more files in the file list and click "Profile" drop-down button, then select an output format for the selected files in the drop-down list that opens. You can also set different formats for different files.
Tips:
1. If you're not satisfied with default profile settings, you can adjust them on the right "Profile Settings" panel to make the output files fit your need.
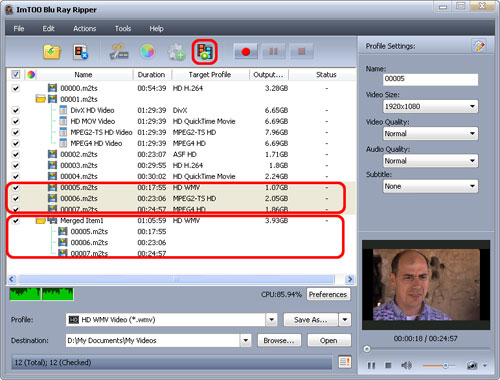
2. Click "Add Profile" button, then an extra profile will be added under the previous profile. Select the newly added profile item, click "Profile" drop-down button and select a new profile from the list. This way, you can output multiple files from the same source file.

3. Click "Tools>Bitrate Calculator" to open "Bitrate Calculator" dialog box. Enter the file size you want and optionally set audio bit rate to compute the video bit rate promptly. Click "OK" to return to the file list, then you'll find that the file size and bit rate will appear respectively in the file list and settings panel.

4. The software provides you the possibility of merging multiple files into a single one. Select all files needed to merge in the file list and click "Merge" button on the toolbar, then all the selected files will be merged into one file and added to the file list.
Tips:
1. If you want to clip your video file and edit its effect before ripping, please refer to Part 2: Clip Video File and Part 3: Edit Video Effect.
2. Before ripping, you can preview any file from the right-bottom player: select a video file in the file list, click Play button in the player.
When the video plays a certain scene you like, click Snapshot button to store the image in the snapshot folder. You can set the snapshot folder by clicking "Change Snapshot Folder" option from "Settings…" drop-down list and selecting the snapshot folder you want in the dialog box that opens.
3. You can click "Pause Checked Item(s)" button to make the ripping process pause and "Stop Checked Item(s)" button to cancel the process as required.
4. If you have other more important applications running, click "File> Run Background" option to run the software in the background.
Part 2: Clip Video File
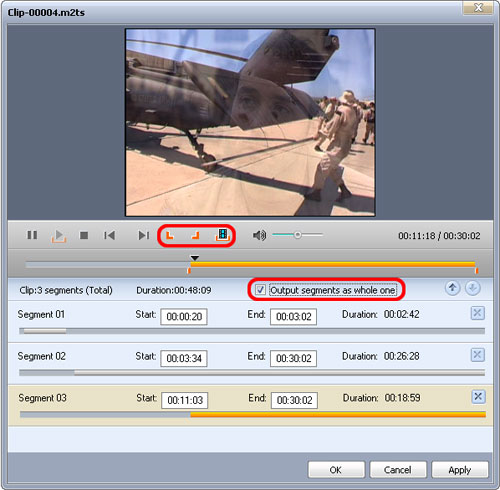
The software allows you to clip video file to extract all the segments you want and output them respectively or as a whole one.
Step 1: Select a video file in the file list, click "Clip" button on the toolbar to open "Clip" window.
Step 2: Click "Play" button to play the video file. When it comes the point you want, click "Set Start Point" button to set it as the start point and set end point in the same way, then the segment you want will be displayed in the segment list below.
Step 3: Click the "New Clip" button to create a new segment in the segment list, then repeat the Step 2 to set its start and end point. Repeat this step to clip as many segments as you want.
Step 4: Check "Output segments as a whole one" checkbox and click "OK" button, then a new file including all the segments will be added into the file list. Or if you don't want to merge them, then uncheck "Output segments as a whole one" checkbox, click "OK" button and add all the segments into the file list.
Part 3: Edit Video Effect
The software offers video editing tools to help you change the video effect.
Before editing, select a video file you want and click "Effect" button on the toolbar to open "Effect" window.
1. Crop
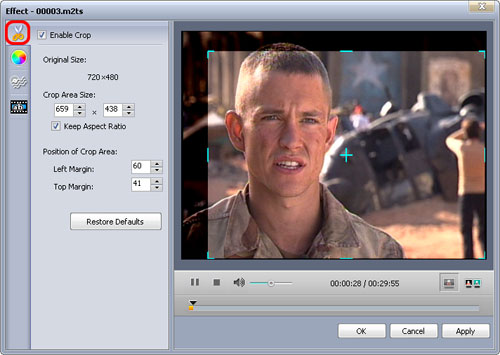
Step 1: Click "Crop" button on the left of the "Effect" window to open "Crop" setting page. The "Enable Crop" option is checked by default.
Step 2: Enter the width and height below the "Crop Area Size" label and check "Keep Aspect Ratio" option as required to set the crop area size, and enter the "Left Margin" and "Right Margin" to set the position of crop area.
Tips:
1. You can also adjust crop area by dragging the central and surrounding handles in the image to adjust the crop area.
2. If you don't want to apply the crop settings to the video, then uncheck "Enable Crop" option.
3. Click "Restore Defaults" button to restore the crop settings to default.
2. Effect
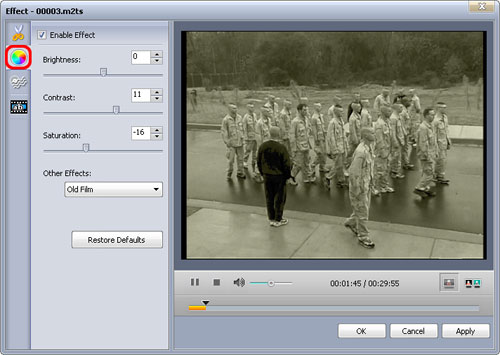
Step 1: Click "Effect" button on the left of the "Effect" window to open "Effect" setting page. The "Enable Crop" option is checked by default.
Step 2: Drag the sliders below the "Brightness", "Contrast" and "Saturation" or enter the values you want to respectively set the brightness, contrast and saturation.
Step 3: Open "Other Effects" drop-down list, select an effect you favor to apply to your video.
Tips:
1. If you don't want to apply the effect settings to the video, then uncheck "Enable Effect" option.
2. Click "Restore Defaults" button to restore the effect settings to default.
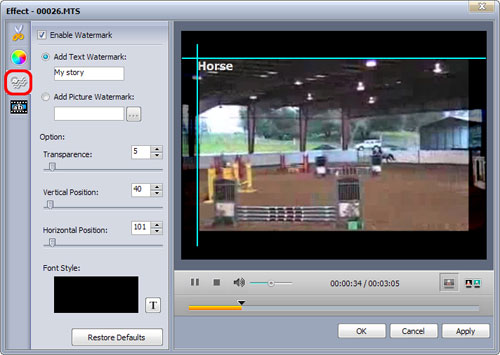
3. Watermark
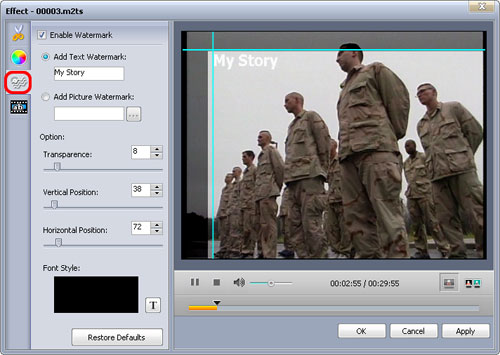
Step 1: Click "Watermark" button on the left of the "Effect" window to open "Watermark" setting page. The "Enable Watermark" option is checked by default.
Step 2: Select "Add Text Watermark" option and enter the text you want as the watermark in the textbox below the option. Or if you want to add picture watermark, then select "Add Picture Watermark" option and select a picture in the dialog that opens as the watermark.
Step 3: Drag the sliders below the "Transparency", "Vertical Position" and "Horizontal Position" options or directly enter the values in the corresponding textboxes to respectively set them. And enter the width and height below the "Watermark Size" option and check "Keep Aspect Ratio" option as required to set the watermark size.
Tips:
1. You can also adjust the watermark position by dragging the vertical & horizontal line displayed on the watermark in the preview window.
2. If you don't want to apply the watermark settings to the video, then uncheck "Enable Watermark" option.
3. Click "Restore Defaults" button to restore the watermark settings to default.
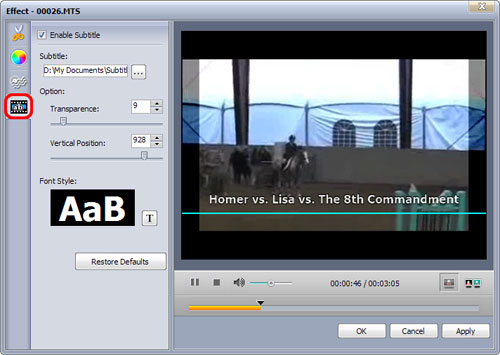
4. Subtitle
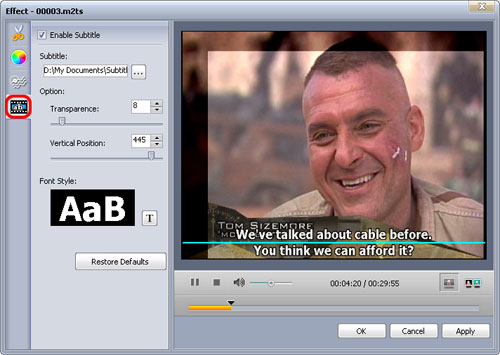
Step 1: Click "Subtitle" button on the left of the "Effect" window to open "Subtitle" setting page. The "Enable Subtitle" option is checked by default.
Step 2: Drag the sliders below the "Transparency" and "Vertical Position" options or directly enter the values in the corresponding textboxes to respectively set them.
Tip: You can also adjust the vertical position of the subtitle by dragging the horizontal line displayed on the subtitle up and down.
Step 3: Click "Settings" button below "Font Style" label to set the font style.
Tips:
1. If you don't want to apply the subtitle settings to the video, then uncheck "Enable Subtitle" option.
2. Click "Restore Defaults" button to restore the subtitle settings to default.
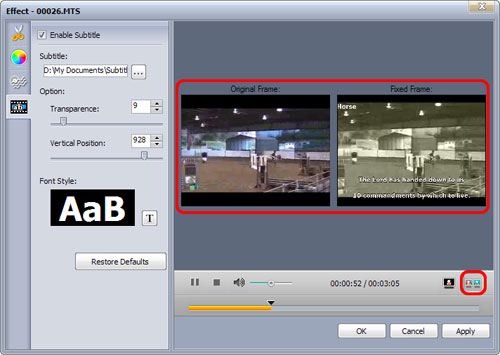
5. Compare
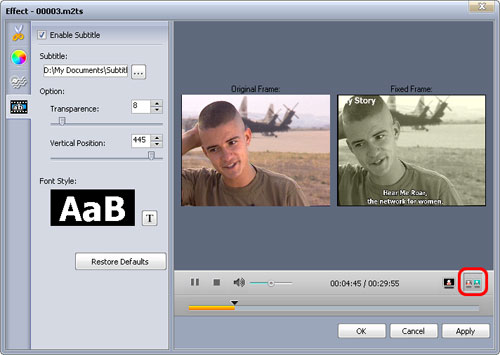
Click "Comparing Preview" button below the preview window, then the original frame and fixed frame will be played at the same time in the two parallel preview windows.
This step-by-step guide is to show you the basic skills of how to rip blu ray disc to high-definition or general video files with ImTOO Blu Ray Ripper.
Before you start, please download, install and launch ImTOO Blu Ray Ripper.
For your convenience, this guide is divided into 3 parts:
Part 1: Getting Started
Part 2: Clip Video File
Part 3: Edit Video Effect
Part 1: Getting Started
Step 1: Load blu ray disc
Insert a blu ray disc, and click "Add Blu Ray Folder" button on the toolbar, then select the inserted disc in the dialog box that opens. All the titles in the disc will be displayed in the file list as below.
Step 2: Set destination
Click "Browse" button at the bottom of the window, and select a folder as "Destination" to save the output files on a designated folder.
Tip: Click "Open" button to check the output files directly after ripping is done.
Step 3: Select output format
Select one or more files in the file list and click "Profile" drop-down button, then select an output format for the selected files in the drop-down list that opens. You can also set different formats for different files.
Tips:
1. If you're not satisfied with default profile settings, you can adjust them on the right "Profile Settings" panel to make the output files fit your need.
2. Click "Add Profile" button, then an extra profile will be added under the previous profile. Select the newly added profile item, click "Profile" drop-down button and select a new profile from the list. This way, you can output multiple files from the same source file.
3. Click "Tools>Bitrate Calculator" to open "Bitrate Calculator" dialog box. Enter the file size you want and optionally set audio bit rate to compute the video bit rate promptly. Click "OK" to return to the file list, then you'll find that the file size and bit rate will appear respectively in the file list and settings panel.
4. The software provides you the possibility of merging multiple files into a single one. Select all files needed to merge in the file list and click "Merge" button on the toolbar, then all the selected files will be merged into one file and added to the file list.
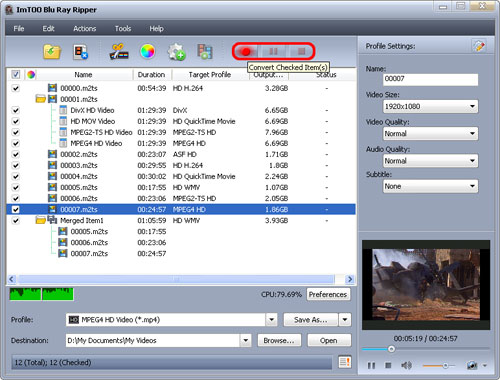
Step 4: Rip blu ray disc
After the above settings, check the needed files to rip in the file list, and click "Convert Checked Item(s)" button on the toolbar to start ripping. You can check the ripping progress from the progress bar at the bottom of the window.
Tips:
1. If you want to clip your video file and edit its effect before ripping, please refer to Part 2: Clip Video File and Part 3: Edit Video Effect.
2. Before ripping, you can preview any file from the right-bottom player: select a video file in the file list, click Play button in the player.
When the video plays a certain scene you like, click Snapshot button to store the image in the snapshot folder. You can set the snapshot folder by clicking "Change Snapshot Folder" option from "Settings…" drop-down list and selecting the snapshot folder you want in the dialog box that opens.
3. You can click "Pause Checked Item(s)" button to make the ripping process pause and "Stop Checked Item(s)" button to cancel the process as required.
4. If you have other more important applications running, click "File> Run Background" option to run the software in the background.
Part 2: Clip Video File
The software allows you to clip video file to extract all the segments you want and output them respectively or as a whole one.
Step 1: Select a video file in the file list, click "Clip" button on the toolbar to open "Clip" window.
Step 2: Click "Play" button to play the video file. When it comes the point you want, click "Set Start Point" button to set it as the start point and set end point in the same way, then the segment you want will be displayed in the segment list below.
Step 3: Click the "New Clip" button to create a new segment in the segment list, then repeat the Step 2 to set its start and end point. Repeat this step to clip as many segments as you want.
Step 4: Check "Output segments as a whole one" checkbox and click "OK" button, then a new file including all the segments will be added into the file list. Or if you don't want to merge them, then uncheck "Output segments as a whole one" checkbox, click "OK" button and add all the segments into the file list.
Part 3: Edit Video Effect
The software offers video editing tools to help you change the video effect.
Before editing, select a video file you want and click "Effect" button on the toolbar to open "Effect" window.
1. Crop
Step 1: Click "Crop" button on the left of the "Effect" window to open "Crop" setting page. The "Enable Crop" option is checked by default.
Step 2: Enter the width and height below the "Crop Area Size" label and check "Keep Aspect Ratio" option as required to set the crop area size, and enter the "Left Margin" and "Right Margin" to set the position of crop area.
Tips:
1. You can also adjust crop area by dragging the central and surrounding handles in the image to adjust the crop area.
2. If you don't want to apply the crop settings to the video, then uncheck "Enable Crop" option.
3. Click "Restore Defaults" button to restore the crop settings to default.
2. Effect
Step 1: Click "Effect" button on the left of the "Effect" window to open "Effect" setting page. The "Enable Crop" option is checked by default.
Step 2: Drag the sliders below the "Brightness", "Contrast" and "Saturation" or enter the values you want to respectively set the brightness, contrast and saturation.
Step 3: Open "Other Effects" drop-down list, select an effect you favor to apply to your video.
Tips:
1. If you don't want to apply the effect settings to the video, then uncheck "Enable Effect" option.
2. Click "Restore Defaults" button to restore the effect settings to default.
3. Watermark
Step 1: Click "Watermark" button on the left of the "Effect" window to open "Watermark" setting page. The "Enable Watermark" option is checked by default.
Step 2: Select "Add Text Watermark" option and enter the text you want as the watermark in the textbox below the option. Or if you want to add picture watermark, then select "Add Picture Watermark" option and select a picture in the dialog that opens as the watermark.
Step 3: Drag the sliders below the "Transparency", "Vertical Position" and "Horizontal Position" options or directly enter the values in the corresponding textboxes to respectively set them. And enter the width and height below the "Watermark Size" option and check "Keep Aspect Ratio" option as required to set the watermark size.
Tips:
1. You can also adjust the watermark position by dragging the vertical & horizontal line displayed on the watermark in the preview window.
2. If you don't want to apply the watermark settings to the video, then uncheck "Enable Watermark" option.
3. Click "Restore Defaults" button to restore the watermark settings to default.
4. Subtitle
Step 1: Click "Subtitle" button on the left of the "Effect" window to open "Subtitle" setting page. The "Enable Subtitle" option is checked by default.
Step 2: Drag the sliders below the "Transparency" and "Vertical Position" options or directly enter the values in the corresponding textboxes to respectively set them.
Tip: You can also adjust the vertical position of the subtitle by dragging the horizontal line displayed on the subtitle up and down.
Step 3: Click "Settings" button below "Font Style" label to set the font style.
Tips:
1. If you don't want to apply the subtitle settings to the video, then uncheck "Enable Subtitle" option.
2. Click "Restore Defaults" button to restore the subtitle settings to default.
5. Compare
Click "Comparing Preview" button below the preview window, then the original frame and fixed frame will be played at the same time in the two parallel preview windows.
Monday, January 11, 2010
Five (+1) Best DVD-Ripping Tools
Blogger's Note:
I've come across ImTOO DVD Ripper, and I find the simple interface easy to navigate and use, no complicated settings or confusing terms. I've been using this software since last year and so far hasn't encountered any problems with it. Pretty cool software.


DVD Shrink is a free and capable ripping tool that excels at, as the name would imply, shrinking DVDs. DVDs come in two common formats: DVD-5 (4.7GB) and DVD-9 (8.5GB); the Reauthor mode in DVD Shrink helps you to ditch disc extras and strip most larger DVDs down to fit into a standard (and less expensive) DVD-5 disc. DVD Shrink does a good job handling many protection schemes, but hasn't been updated to remove some of the newest schemes.

DVD Fab is a commercial DVD ripper that supports the removal of all current DVD copy protections. In addition to being current on protection schemes, it boasts a large array of options for stripping and repacking your DVDs once the copy protection is removed. You can rip the entire disc, rip only the main movie, or split it into pieces—among other options. Like DVD Shrink, DVD Fab also supports compressing DVD-9 discs to fit on DVD-5 discs.

Handbrake is a DVD-ripping tool with a strong emphasis on not just ripping media but recoding it for playback on computers, portable devices, and other non-disc based systems. Handbrake can help you convert DVDs and other MPEG-based video into MP4 and MKV files. You can tweak settings like video frame rate and audio codec playback to your heart's content with Handbrake, and even batch encode all your media at one time to make filling up your iPod or other device relatively painless. The one major shortcoming of Handbrake is that it doesn't have any copy protection removal tools built in, which means you may occasionally need to use a 3rd-party stripping tool to prepare your DVD for conversion.

AnyDVD is another commercial entry in this week's Hive Five. It's not cheap, with a one year license running $60—although the multi-year discounts quickly stack up—but it can boast that it stays on top of current protection and encryption schemes to make sure you're never locked out of your own discs. In addition to stripping protections from the disc, it also has the ability to control DVD playback speed so that DVDs played on media center computers will play slower and quieter, and it allows you to remove things like forced subtitles, warning screens, and disc material you don't want.

Although DVD Decrypter hasn't been updated since 2005, it still works on a significant number of DVDs and has a strong following resulting from both its original user base and new users who find it cuts through the copy protection on their current DVDs protected with CSS, Macrovision content protection, region codes, and other hindrances.

Send an email to Jason Fitzpatrick, the author of this post, at
I've come across ImTOO DVD Ripper, and I find the simple interface easy to navigate and use, no complicated settings or confusing terms. I've been using this software since last year and so far hasn't encountered any problems with it. Pretty cool software.
You pay good money for your DVDs, but they're hardly the only format you need these days. These five ripping tools ensure you can back them up, keep them on your media server, and load them on your favorite portable player.
Photo by jonasj.
Earlier this week we asked you to share your favorite DVD-ripping tool. We tallied up the votes, and now we're back to highlight the five most popular tools used by Lifehacker readers to rip, backup, and encode their DVD collections.
DVD Shrink (Windows, Free)
DVD Shrink is a free and capable ripping tool that excels at, as the name would imply, shrinking DVDs. DVDs come in two common formats: DVD-5 (4.7GB) and DVD-9 (8.5GB); the Reauthor mode in DVD Shrink helps you to ditch disc extras and strip most larger DVDs down to fit into a standard (and less expensive) DVD-5 disc. DVD Shrink does a good job handling many protection schemes, but hasn't been updated to remove some of the newest schemes.
DVD Fab (Windows, $50)
DVD Fab is a commercial DVD ripper that supports the removal of all current DVD copy protections. In addition to being current on protection schemes, it boasts a large array of options for stripping and repacking your DVDs once the copy protection is removed. You can rip the entire disc, rip only the main movie, or split it into pieces—among other options. Like DVD Shrink, DVD Fab also supports compressing DVD-9 discs to fit on DVD-5 discs.
Handbrake (Windows/Mac/Linux, Free)
Handbrake is a DVD-ripping tool with a strong emphasis on not just ripping media but recoding it for playback on computers, portable devices, and other non-disc based systems. Handbrake can help you convert DVDs and other MPEG-based video into MP4 and MKV files. You can tweak settings like video frame rate and audio codec playback to your heart's content with Handbrake, and even batch encode all your media at one time to make filling up your iPod or other device relatively painless. The one major shortcoming of Handbrake is that it doesn't have any copy protection removal tools built in, which means you may occasionally need to use a 3rd-party stripping tool to prepare your DVD for conversion.
AnyDVD (Windows, $60 per year)
AnyDVD is another commercial entry in this week's Hive Five. It's not cheap, with a one year license running $60—although the multi-year discounts quickly stack up—but it can boast that it stays on top of current protection and encryption schemes to make sure you're never locked out of your own discs. In addition to stripping protections from the disc, it also has the ability to control DVD playback speed so that DVDs played on media center computers will play slower and quieter, and it allows you to remove things like forced subtitles, warning screens, and disc material you don't want.
DVD Decrypter (Windows, Free)
Although DVD Decrypter hasn't been updated since 2005, it still works on a significant number of DVDs and has a strong following resulting from both its original user base and new users who find it cuts through the copy protection on their current DVDs protected with CSS, Macrovision content protection, region codes, and other hindrances.
Now that you've had a chance to look over the five most popular DVD-ripping tools as nominated by Lifehacker readers, it's time to cast your vote for the tool you like best:
DVD Shrink
DVD Fab
Handbrake
AnyDVD
DVD Decrypter
Other
DVD Fab
Handbrake
AnyDVD
DVD Decrypter
Other
Have a favorite that wasn't featured or a tip for ripping DVDs? Let's hear about it in the comments. If you have an idea for a future Hive Five send us an email at tips @ lifehacker.com with "Hive Five" in the subject line.
Send an email to Jason Fitzpatrick, the author of this post, at
Thursday, January 7, 2010
Tutorial: ImTOO Download YouTube (Freeware)
........................
If you set the "Start Type" option as "Start Now", then the selected video will be promptly downloaded and saved to the folder you set in the Step 1. Otherwise, click "Start" button on the toolbar to start the task anytime you want.....
Download YouTube videos with ....
ImTOO Download YouTube Video for FREE....
Here’s a simple guide on how to download YouTube videos. Yup, you can actually rip videos off YouTube.com! ....
Why rip videos off YouTube though? So you can watch them on your iPod, iPhone, on your PSP, even offline! ....
There are 3 ways to download YouTube videos:....
b) By creating a New Task....
..
· Browse YouTube videos with IE browser, visit YouTube and view the videos you want to download.....
· Download YouTube videos from the IE right-click menu.....
· Right click the YouTube video thumbnail, and choose "Download with ImTOO Download YouTube Video".....
· A "New Download" dialog appears, and the video URL is automatically added into the "URL" textbox.....
· Click “Browse” button and choose the folder where you want to put your converted iPhone ringtone. ....
· Click “Start Now” to start downloading!
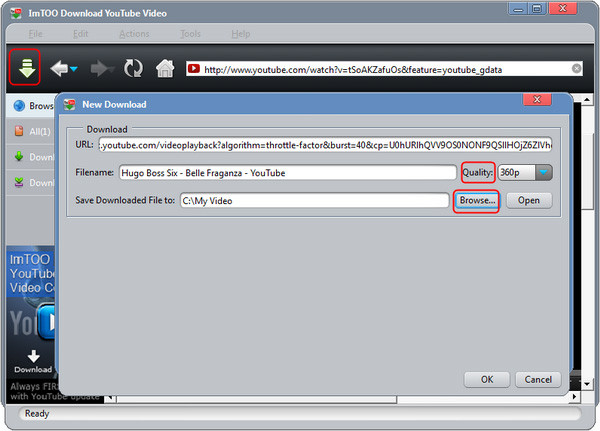
b. Create a new task....
Click "New Download" button on the toolbar of ImTOO YouTube Download window. Copy the URL of the YouTube video you want, then paste it into the "URL" textbox.....
Tips:....
You can drag and drop the video URL directly to the main window or the suspended Drop Zone to create a new task.....
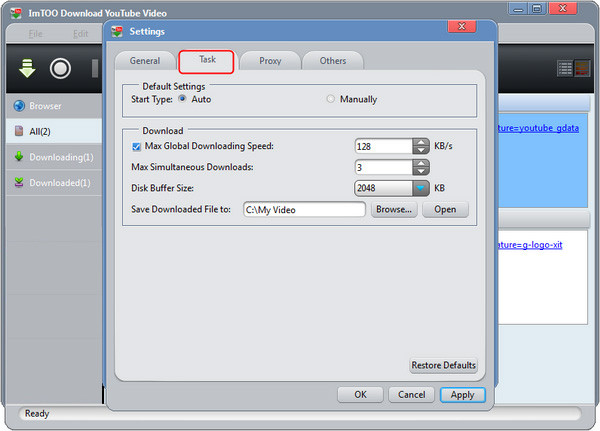
c. Download YouTube videos with the built-in YouTube Video Browser.... Adjust the task settings....
Click "Tools > Settings" option from the main menu. Click to open the "Task" tab, and set the "Destination" and "Start Task" options in the "Task Default Configuration" area according to your own requirements.....
....
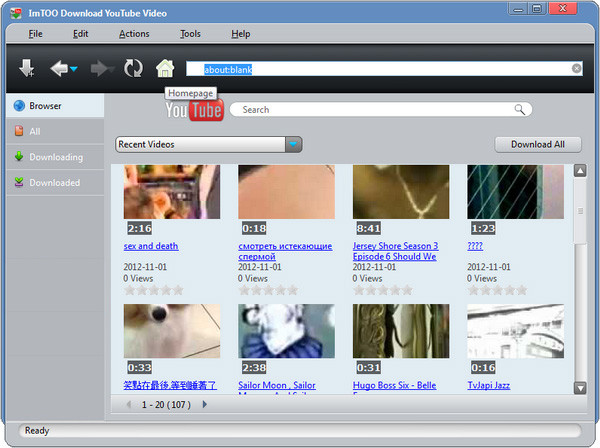
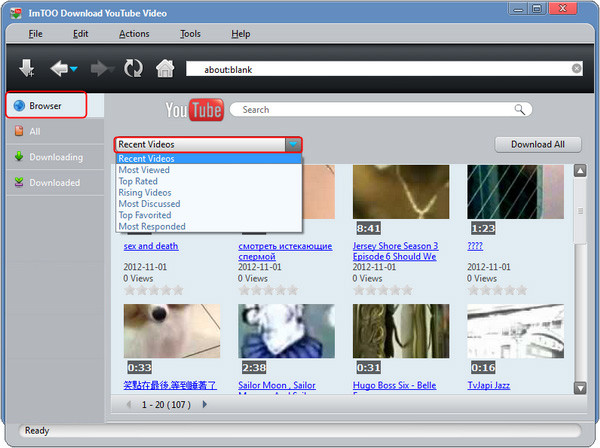
Browse YouTube videos in the built-in browser....
· Click "Browse videos" button on the toolbar or check "Browser..." option in the "Tools" menu to open the "YouTube Video Browser" window. ....
· Use the filter buttons at the bottom to browse the YouTube videos by different categories: Recent Videos, Most Viewed, Top Rated, Most Responded, Spotlight Videos, Top Favorite, Watch on Mobile, Most Discussed and Rising Videos.....
....
Tips:....
- You can search for the videos you’re interested by typing the keyword into the "Search" textbox and clicking the magnifier button at the right.....
- Click the link below the video thumbnail, or right click the video thumbnail and click "Play" option from the right-click menu to open the web page with your default web browser and watch the YouTube video online.....
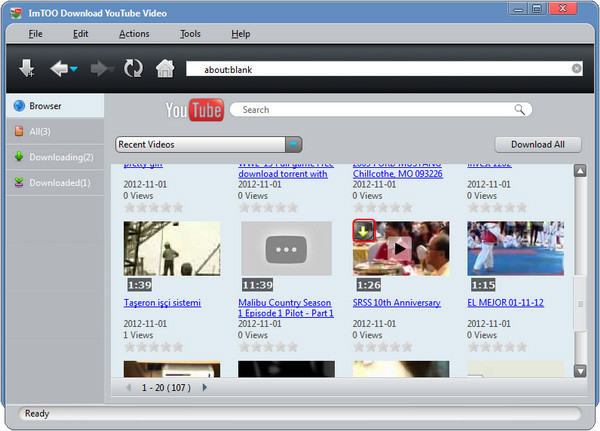
Start downloading
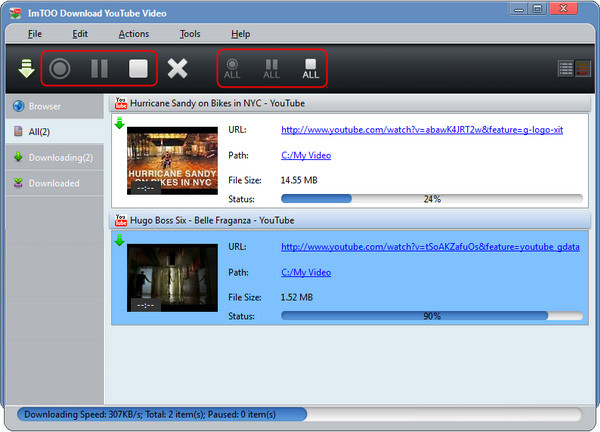
Click the down arrow at the left top of the video you want; ....
Click the down arrow at the left top of the video you want; ....
OR drag and drop the video into the main window; ....
OR right click the video thumbnail and click "Download Video" option from the right-click menu to start a new task. ....
If you set the "Start Type" option as "Start Now", then the selected video will be promptly downloaded and saved to the folder you set in the Step 1. Otherwise, click "Start" button on the toolbar to start the task anytime you want.....
....
Tips:....
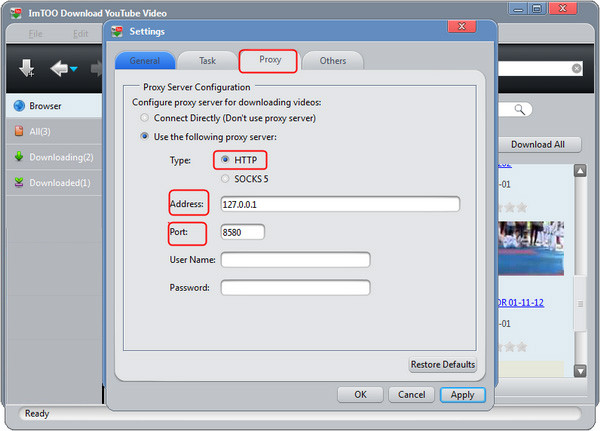
- If your Internet Service Provider blocked YouTube site, you can bypass the firewall by setting the proxy server as below:
Open the "Tools > Settings > Proxy" tab, choose the proxy server type, enter the address and port of the proxy server, and if necessary, enter the user name and password, then click OK button to return to the main window and retry the downloading. ....
....
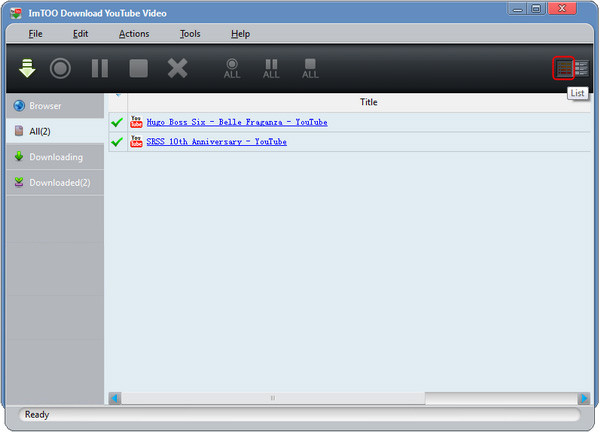
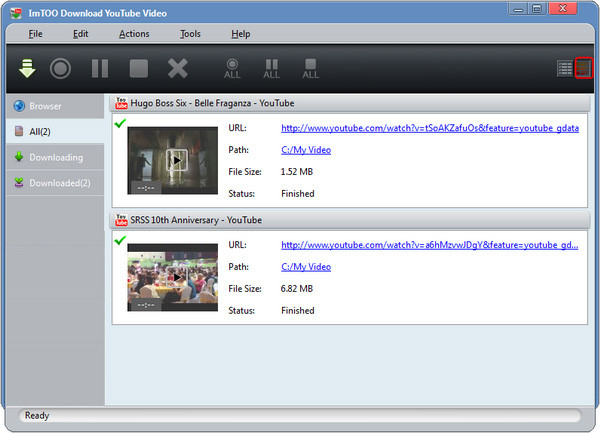
- You can click "Start All" button on the toolbar to start downloading all the files in the file list, and control the process by the "Pause", "Stop", "Pause All", "Stop All" and "Remove" buttons.....
- There’re two modes to view the files in the file list: list and thumbnails. Click the "List" and "Thumbnails" buttons to switch the view mode. ....
....
....
.. ..
.. ..
Tips and tricks: ....
Tuesday, January 5, 2010
Tutorial: AVCHD Converter
ImTOO AVCHD Converter Guide
This guide will show you how to convert MTS/MT2S/MOD files to all popular HD/SD videos suitable for different multimedia devices with ImTOO AVCHD Converter step by step.
This guide includes 3 parts:
1. Load video files
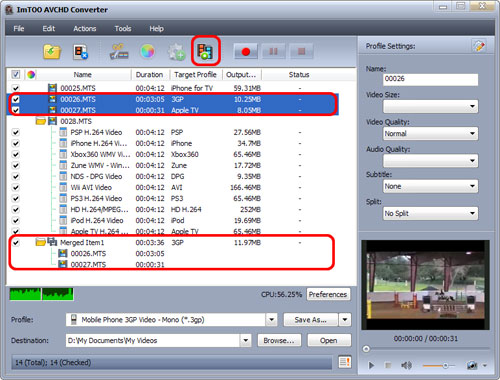
Click "Add File(s)" button on the toolbar or click "File > Add File(s)…" option from the main menu, and choose the video files you want to convert in the dialog that opens to load them into the file list.
Tip: If you want to load all the files in a folder, then click "File > Add Folder…" option from the main menu to choose the folder in the dialog that opens, then all the files in the folder will be added into the file list.
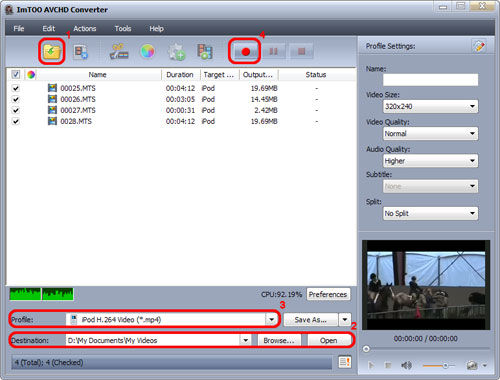
2. Select output folder
Click "Browse" button at the right of "Destination" label to choose a folder for saving the output files in the dialog box that opens.
Tip: Click "Open" button beside "Browse" button to check the output files after conversion done.
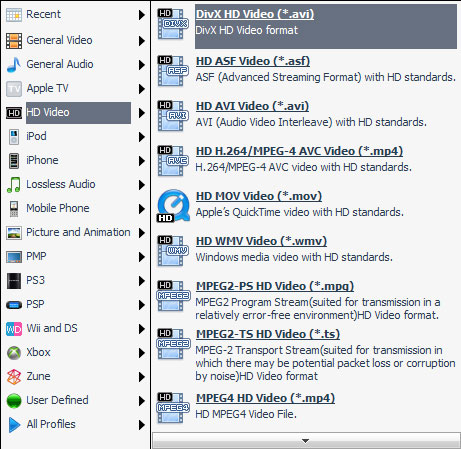
3. Select output format
Select one or more files in the file list, click "Profile" drop-down button, and select an output format for the selected files in the drop-down list that opens. Or you can set different formats for different files.
Tips:
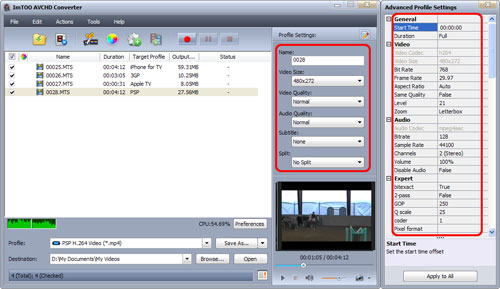
1. If you're not satisfied with default profile settings, then adjust general parameters on the right "Profile Settings" panel, or if necessary, click "Show Advanced Profile Settings" button to open "Advanced Profile Settings" window to do more advanced settings.
2. To output multiple output files from one source file simultaneously, please click "Add Profile" button to add an extra profile under the previous profile, and select this newly added item, then click "Profile" drop-down button to choose a new profile from the list.
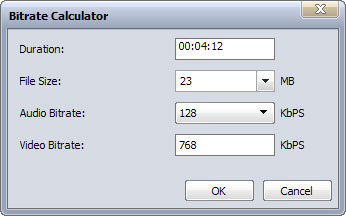
3. To customize the output file size exactly, please click "Tools>Bitrate Calculator" to open "Bitrate Calculator" dialog box, enter the file size you want and optionally set audio bit rate to compute the video bit rate promptly. Click "OK" to return to the file list, the file size and bit rate will be appeared respectively in the file list and settings panel.
4. To merge multiple files into a single one, select all files needed to merge in the file list and click "Merge" button on the toolbar, then all the selected files will be merged into one file and added to the file list.
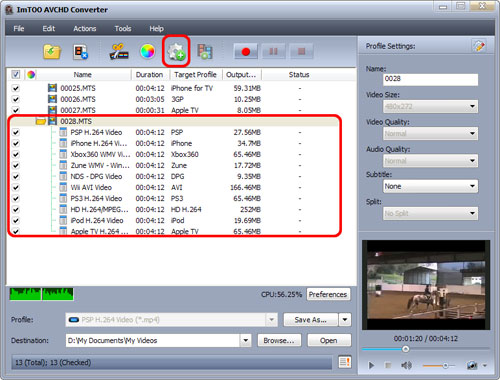
4. Convert
After the tweaking settings as suggested above, check the needed files to convert in the file list, and click "Convert Checked Item(s)" button on the toolbar to start converting. You can check the converting progress from the progress bar at the bottom of the window.
Tips:
1. If you want to do more settings with your video file before conversion, please refer to Part 2: Clip Video File and Part 3: Edit Video Effect.
2. You can preview any video file and take snapshot in the player at the bottom right. Select the file in the file list, and click "Play" button in the player to play the file. When the video plays a certain scene you like, click "Snapshot" button to store the image in the snapshot folder.
3. Click "Pause Checked Item(s)" button to make the converting process pause and "Stop Checked Item(s)" button to cancel the process as required.
4. If you have other programs running besides ImTOO, click "File> Run Background" option to run the software in the background.
The clip tool can cut the segments you choose and output them respectively or as a merged one.
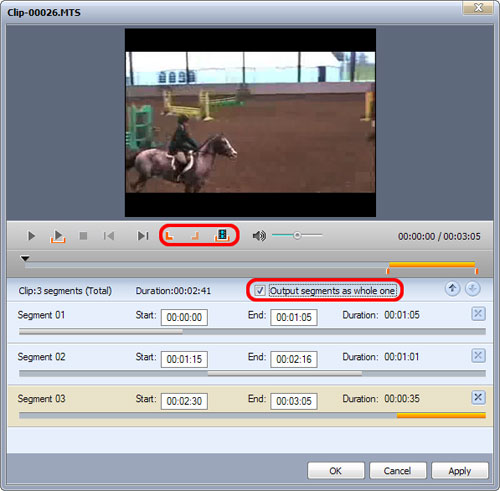
Step 1: Select a video file in the file list, click "Clip" button on the toolbar to open "Clip" window.
Step 2: Click "Play" button to play the video file. When it comes to the point you want, click "Set Start Point" button to set it as the start point and set end point in the same way, then the segment you want will be displayed in the segment list below.
Step 3: Click the "New Clip" button to create a new segment in the segment list, then repeat the Step 2 to set its start and end point. Repeat this step to clip as many segments as you want.
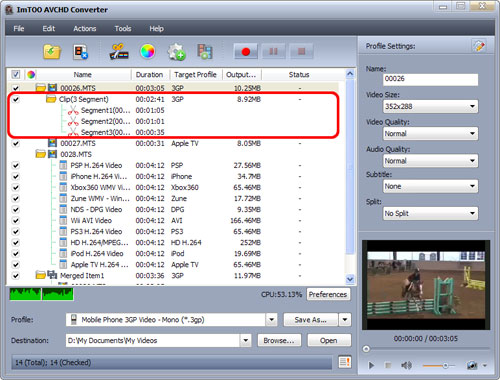
Step 4: Check "Output segments as a whole one" checkbox and click "OK" button, then a new file including all the segments will be added into the file list. Or if you don't want to merge them, then uncheck "Output segments as a whole one" checkbox, click "OK" button and add all the segments into the file list.
You can edit a video first before converting it. Select a video file you want from the file list and click "Effect" button on the toolbar to open "Effect" window.
1. Crop
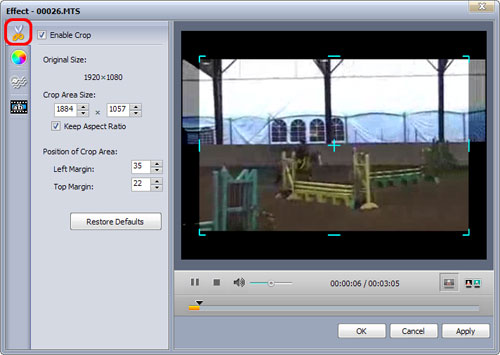
Step 1: Click "Crop" button on the left of the "Effect" window to open "Crop" setting page. The "Enable Crop" option is checked by default.
Step 2: Enter the width and height below the "Crop Area Size" label and check "Keep Aspect Ratio" option as required to set the crop area size, and enter the "Left Margin" and "Right Margin" to set the position of crop area.
Tips:
1. You can also adjust crop area by dragging the central and surrounding handles in the image to adjust the crop area.
2. If you don't want to apply the crop settings to the video, then uncheck "Enable Crop" option.
3. Click "Restore Defaults" button to restore the crop settings to default.
2. Effect

Step 1: Click "Effect" button on the left of the "Effect" window to open "Effect" setting page. The "Enable Crop" option is checked by default.
Step 2: Drag the sliders below the "Brightness", "Contrast" and "Saturation" or enter the values you want to respectively set the brightness, contrast and saturation.
Step 3: Open "Other Effects" drop-down list, select an effect you favor to apply to your video.
Tips:
1. If you don't want to apply the subtitle settings to the video, then uncheck "Enable Subtitle" option.
2. Click "Restore Defaults" button to restore the effect settings to default.
3. Watermark
Step 1: Click "Watermark" button on the left of the "Effect" window to open "Watermark" settings page. The "Enable Watermark" option is checked by default.
Step 2: Select "Add Text Watermark" option and enter the text you want as the watermark in the textbox below the option. Or if you want to add picture watermark, then select "Add Picture Watermark" option and select a picture in the dialog that opens as the watermark.
Step 3: Drag the sliders below the "Transparency", "Vertical Position" and "Horizontal Position" options or directly enter the values in the corresponding textboxes to respectively set them. And enter the width and height below the "Watermark Size" option and check "Keep Aspect Ratio" option as required to set the watermark size.
Tips:
1. You can also adjust the watermark position by dragging the vertical & horizontal line displayed on the watermark in the preview window.
2. Click "Restore Defaults" button to restore the watermark settings to default.
4. Subtitle
Step 1: Click "Subtitle" button on the left of the "Effect" window to open "Subtitle" setting page. The "Enable Subtitle" option is checked by default.
Step 2: Drag the sliders below the "Transparency" and "Vertical Position" options or directly enter the values in the corresponding textboxes to respectively set them.
Step 3: Click "Settings" button below "Font Style" label to set the font style.
Tips:
1. You can also adjust the position of the subtitle by dragging the horizontal line displayed on the subtitle up and down.
2. Click "Restore Defaults" button to restore the subtitle settings to default.
5. Compare
Click "Comparing Preview" button below the preview window, then the original frame and fixed frame will be played at the same time in the preview windows side by side.
Subscribe to:
Posts (Atom)